멀티 Thread 테스트중 동일 클래스를 여러개 띄울 일이 생겼습니다.
IntelliJ 로 실행하면 1개만 뜨더군요.
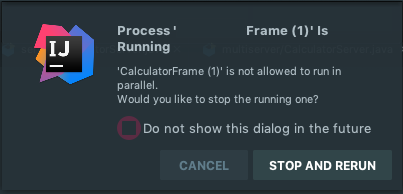
하나 더 띄울려고 하면 기존 쓰레드를 중지하라고 안내창이 떠서 CLI로 여러개를 띄워야겠다 싶었지요.
Java 개발자가 CLI Java 실행 방법을 다 알까?
IDE에 익숙한 그대여, 아는가?
(동료 개발자에게 물었더니 IDE 에서 우클릭해서 Run 하라고 알려줌;;)
Compile
가볍게 몸풀기 해볼까요?
프로젝트 생성후 src 디렉토리에 Hello.java 파일을 생성합니다.
1
2
3
4
5
6
public class Hello {

	public static void main(String[] args) {
		System.out.println("Hello World!");
	}
}
javac
동일 src 디렉토리에서 javac 명령을 수행해서 src 디렉토리에 binary 파일 생성~
1
2
3
4
5
$ javac Hello.java

$ ls
Hello.java
Hello.class
java
동일 src 디렉토리에서 java 명령으로 실행해볼까요?
1
2
3
$ java Hello

Hello World!
잘되네요.
javap
그럼 javap 명령으로 역컴파일(Decompile) 해볼까요?
1
2

$ javap Hello > Hello.javap
디컴파일한 파일 내용을 보니 디컴파일 했다는 Compiled from 정보가 추가되어 있네요.
1
2
3
4
5
Compiled from "Hello.java"
public class Hello {
  public Hello();
  public static void main(java.lang.String[]);
}
IDE 에서 바이너리 파일을 열면 CLI 명령어 보다 깔끔하게 자동으로 역컴파일 해주지요. (ex. IntelliJ)
1
2
3
4
5
6
7
8
9
10
11
12
13
//
// Source code recreated from a .class file by IntelliJ IDEA
// (powered by Fernflower decompiler)
//

public class Hello {
    public Hello() {
    }

    public static void main(String[] var0) {
        System.out.println("Hello World!");
    }
}
Java Compile vs Gradle
javac 컴파일 할때 사용할 수 있는 옵션이 있는데요.
-source : 컴파일에 사용하는 JDK, Java 버전과 일치하는 값을 포함합니다 (예: JDK8의 경우 1.8). 소스 코드에서 사용할 수 있는 기능을 해당 Java 버전으로 제한합니다.
-target : soource 옵션과 유사하지만 생성된 클래스 파일의 버전을 제어합니다. 프로그램이 실행될 수 있는 가장 낮은 자바 버전이 될 것임을 의미합니다.
  --source <release>, -source <release>
        Provide source compatibility with the specified Java SE release. Supported releases: 7, 8, 9, 10, 11, 12, 13, 14, 15, 16, 17

  --target <release>, -target <release>
        Generate class files suitable for the specified Java SE release. Supported releases: 7, 8, 9, 10, 11, 12, 13, 14, 15, 16, 17
1
2

$ javac Main.java -source 1.7 -target 1.8
역컴파일(Decompile) 했을때 정보를 볼까요?
java 1.8 로 target 옵션을 주면 major version 항목에 java 8 클래스 파일의 버전인 52가 나옵니다.
1
2
3
4
5
6
7
8
9
10
11
12
13

$ javap -verbose Main.class
Classfile /Users/nhn/Documents/source/didalgus/unit/src/main/java/Main.class
  Last modified 2023. 6. 20.; size 414 bytes
  SHA-256 checksum b4c41c5920686379d539984509bbbf79494838b83f97ebaa965efe60337a6771
  Compiled from "Main.java"
public class Main
  minor version: 0
  major version: 52
  flags: (0x0021) ACC_PUBLIC, ACC_SUPER
  this_class: #21                         // Main
  super_class: #2                         // java/lang/Object
  interfaces: 0, fields: 0, methods: 2, attributes: 1
target 에 11 버전을 설정했습니다.
1
2

$ javac Main.java -source 1.8 -target 11
11 버전은 major version: 55 이군요.
1
2
3
4
5
6
7
8
9
10
11
12
13

$ javap -verbose Main.class
Classfile /Users/nhn/Documents/source/didalgus/unit/src/main/java/Main.class
  Last modified 2023. 6. 20.; size 414 bytes
  SHA-256 checksum cc7484351b8c696b7dbcb501f4c145456197f14cc00c638dd06cfe49e24cddb4
  Compiled from "Main.java"
public class Main
  minor version: 0
  major version: 55
  flags: (0x0021) ACC_PUBLIC, ACC_SUPER
  this_class: #21                         // Main
  super_class: #2                         // java/lang/Object
  interfaces: 0, fields: 0, methods: 2, attributes: 1
javac 명령의 -source, -target 옵션을 Gradle 에서도 지원합니다.
sourceCompatibility, targetCompatibility 항목으로 소스 및 대상 옵션을 설정할 수 있습니다.
1
2
3
4
java {
    sourceCompatibility = "1.6"
    targetCompatibility = "1.8"
}
출처 : Gradle: sourceCompatiblity vs targetCompatibility
Compile Package
![]()
프로젝트 생성후 ./src/lesson/디렉토리에 Hello.java 파일을 생성합니다.
1
2
3
4
5
6
7
8
package lesson;

public class Hello {

	public static void main(String[] args) {
		System.out.println("Hello World!");
	}
}
javac package
그럼 패키지 구성된 파일은 어떻게 컴파일 하면 될까요?
사실 위에 기본적인 명령과 동일합니다. 옵션은 취향껏(?) 넣으시면 되지요.
javac -classpath [라이브러리 파일] -d [클래스파일빌드] [원본소스1경로] [원본소스2 경로] …
javac -classpath [라이브러리 파일] -d [클래스파일빌드] [소스경로/*.java]
매뉴얼을 볼까요?
1
2
3
4
5
6
7
8
9
10
11
12
13
14
15
16
17
18
19
$ man javac

Standard Options
   -classpath classpath
          Sets  the  user  class path, overriding the user class path in the CLASSPATH environment variable.  If neither CLASSPATH or -classpath is specified,
          the user class path consists of the current directory.  See Setting the Class Path for more details.

          If the -sourcepath option is not specified, the user class path is searched for both source files and class files.


   -d directory
          Sets the destination directory for class files.  The destination directory must already exist; javac will not create the destination directory.   If
          a class is part of a package, javac puts the class file in a subdirectory reflecting the package name, creating directories as needed.  For example,
          if you specify -d /home/myclasses and the class  is  called  com.mypackage.MyClass,  then  the  class  file  is  called  /home/myclasses/com/mypack-
          age/MyClass.class.

          If -d is not specified, javac puts the class file in the same directory as the source file.

          Note: The directory specified by -d is not automatically added to your user class path.
- 노옵션 컴파일
-d 옵션없이 빌드 하는 경우 명령을 실행하는 위치에 바이너리 파일이 생성됩니다.
위에 예시를 참고하세요.
- directory
컴파일된 바이너리 파일들의 위치를 지정해볼까요?
경로는 프로젝트 /my-project/ root 디렉토리로 이동합니다.
-d bin 옵션으로 바이너리 파일 위치를 지정해주세요.
1
2
3
$ javac -d bin ./src/lesson/Hello.java
  =
$ javac -d ./bin ./src/lesson/*.java
bin 디렉토리에 가서 볼까요?
bin 디렉토리 하위에 lesson 디렉토리와 Hello.class 파일이 생성되었네요.
1
2
3
$ ll ./bin/lesson/

-rw-r--r--  1 we  staff   425B  7 23 11:34 Hello.class
- classpath
servlet 라이브러리가 필요한 경우예요.
1
$ javac -d build/classes/ -classpath /tomcat/lib/servlet-api.jar src/lesson/*.java
필요한 라이브러리가 여러개 인경우 각 jar 파일을 개별로 지정해줄수 있지요.
1
$ javac -d build/ -classpath "./WebContent/WEB-INF/lib/mysql-connector-java-5.1.26-bin.jar:/tomcat/lib/servlet-api.jar" ./src/servlets/*.java
다 귀찮아~!
1
$ javac -d build/ -classpath "./WebContent/WEB-INF/lib/*:/tomcat/lib/*" ./src/servlets/*.java
java package
“에러를~ 피하고~ 싶었어~ 아무리 애를써도~”
1
2
3
$ java Hello

오류: 기본 클래스 Hello을(를) 찾거나 로드할 수 없습니다.
명령어 기본 사용법입니다.
java -classpath 라이브러리파일 패키지명.클래스이름
classpath로 지정한 bin 디렉토리로 이동합니다.
패키지 파일을 실행해 볼까요?
1
2
3
4
5
$ java lesson/Hello
Hello World!

$ java lesson.Hello
Hello World!
패키지명으로 호출해도 되고 디렉토리경로로 호출해도 되는군요.
1
2
3
4
5
6
7
8
$ man java

    -classpath classpath
    -cp classpath
          Specifies a list of directories, JAR archives, and ZIP archives to search for class files.  Class path entries are separated by colons (:). Specifying -classpath or -cp overrides any  setting  of
          the CLASSPATH environment variable.

          If -classpath and -cp are not used and CLASSPATH is not set, the user class path consists of the current directory (.).
bin 디렉토리로 이동하지 않고 classpath 를 지정해서 실행하는 방법도 있습니다.
실행해볼까요?
1
2
$ java -classpath ./bin/ lesson.Hello
Hello World!
다른 명령도 구경해볼까요?
$ java -classpath groovy.jar:asm.jar Test
IDE classpath
IDE별 Output 기본경로는 아래와 같지요.
| IDE | pwd |
|---|---|
| 인텔리제이 | /project-root/out/ |
| 이클립스 | /project-root/bin/ |
Glossary (용어 사전)
Java SE (Java Platform, Standard Edition)
자바의 표준안, 소프트웨어의 설계도
JCP(Java Community Process, http://jcp.org) 에 의해 관리
Java EE (Java Platform, Enterprise Edition)
Java EE 기술 사양은 한가지 기술을 정의한 것이 아니라 기업용 애플리케이션과 클라우드 애플리케이션 개발에 필요한 여러가지 복합적인 기술들을 정의하고 모아 놓은 것입니다.
JDK(Java Development Kit)
개발자용
Java SE의 표준안에 따라서 만들어진 구체적인 소프트웨어
Java 프로그램을 실행하면 Java 코드를 컴파일하는 컴파일러와 개발에 필요한 각종 도구 그리고 JRE가 포함
JRE(Java Runtime Environment)
일반인용
자바가 실제로 동작하는 데 필요한 JVM, 라이브러리, 각종 파일들이 포함
JVM(Java Virtual Machine)
JAVA 실행되는 환경
서블릿 컨테이너 (Servlet Container)
서블릿의 생성과 실행, 소멸 등 생명주기를 관리하는 프로그램
CGI (Common Gateway Interface)
웹 서버와 프로그램 사이의 데이터를 주고 받는 규칙
CGI 프로그램 : 웹서버에 의해 실행되며 CGI 규칙에 따라서 웹 서버와 데이터를 주고 받도록 작성된 프로그램