![]()
소개
Gradle은 Groovy로 만들어진 녀석입니다.
Groovy는 JVM(Java Virtual Machine)위에서 동작하지요.
Gradle에 library를 추가하거나 정교하게 제어할려면 Groovy를 배워야 할테지만
저는 일단 기본적인 기능만 사용할꺼라 간단하게 정리했습니다.
Gradle은 앤트(Ant)의 기본적인 빌드 도구 기능에 메이븐(Maven)의 의존라이브러리 관리 기능을 차용하였습니다.
메이븐은 상속구조인데요.
그래들은 설정 주입방식 사용하기에 유연한 빌드 환경 구성 가능하답니다.
Gradle은 Task를 사용해서 빌드 순서도 제어할 수 있지요.
제가 본 책은 Task 사용을 기본으로 설명하였더라구요.
Task를 사용하지 않는 프로젝트도 있답니다.
Gradle 은 Groovy 로 만들어진 녀석인지라 런타임시에도 설정을 반영할 수있다고 합니다.
(해보진 않았어요)
동작

gradle 은 제일 먼저 settings.gradle 파일을 찾는답니다.
gradle 명령을 실행한 디렉토리에서 찾고 없다면 상위 디렉토리도 뒤지지요.
상위 디렉토리에도 settings.gradle 파일이 없다면 그 빌드는 싱글 프로젝트로 인식되어 실행 됩니다.
setting.gradle 은 프로젝트의 구성 정보를 기록하고, 어떤 하위 프로젝트가 어떤 관계로 구성되어 있는지 기술하지요.
그래서 gradle 은 setting.gradle 에 기술된대로 프로젝트를 구성한답니다.
build.gradle 은 빌드에 필요한 기본 설정 파일이라도 보시면 되겠습니다.
의존성이나 플러그인 설정의 위한 스크립트 파일이지요.
정의된 의존성 설치 후에 프로젝트 인덱싱을 하지요.
Use
제가 유지보수하는 프로젝트는 대부분 Web프로젝트입니다. 그래서 task 쓸일이 없지요.
그러다 맡은 데몬 프로젝트가 task로 동작하기에 살펴보다 실습 해보았습니다.
참고로, Gradle 버전별로 동작이 상이합니다.
실습예제 버전과 로컬환경 버전이 달라 다르게 동작하더군요.
Init
Gradle 에는 init 명령어로 빌드 초기화 를 지원합니다.
init 명령으로 구성할 수 있는 프로젝트를 확인해 봅니다.
$ gradle help --task :init
...
     --type     Set the type of project to generate.
                Available values are:
                     basic
                     cpp-application
                     cpp-library
                     groovy-application
                     groovy-library
                     java-application
                     java-library
                     kotlin-application
                     kotlin-library
                     pom
                     scala-library
basic 으로 시작해 볼까요?
init 명령시 type 옵션을 추가하지 않아도 기본값이 basic 이랍니다.
$ gradle init --type basic  // $ gradle init  동일

Select build script DSL:
  1: groovy
  2: kotlin
Enter selection (default: groovy) [1..2] 1

Project name (default: gralde_practice): practice1

BUILD SUCCESSFUL in 32s
2 actionable tasks: 2 executed
설치 후 디렉토리를 살펴보면 wrapper 디렉토리가 보이지요.
init 명령을 수행하면 자동으로 생성된답니다.
gradle 버전은 init 명령을 실행한 환경에 설치된 버전으로 설정되는군요.
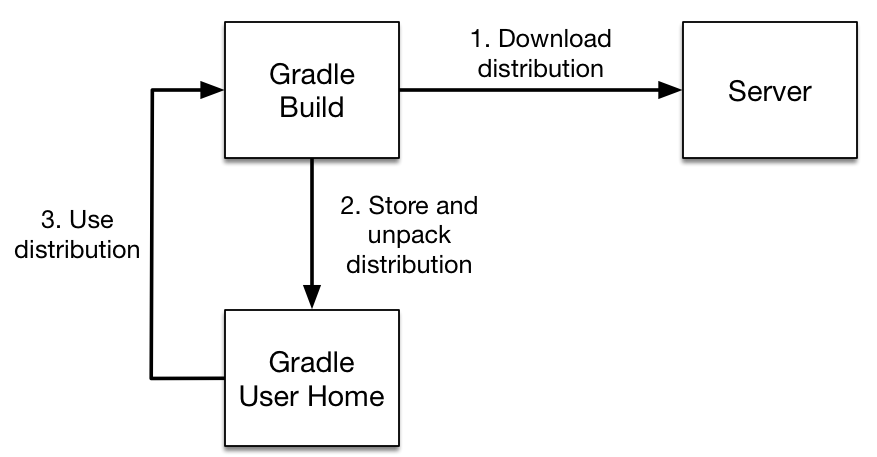
Task
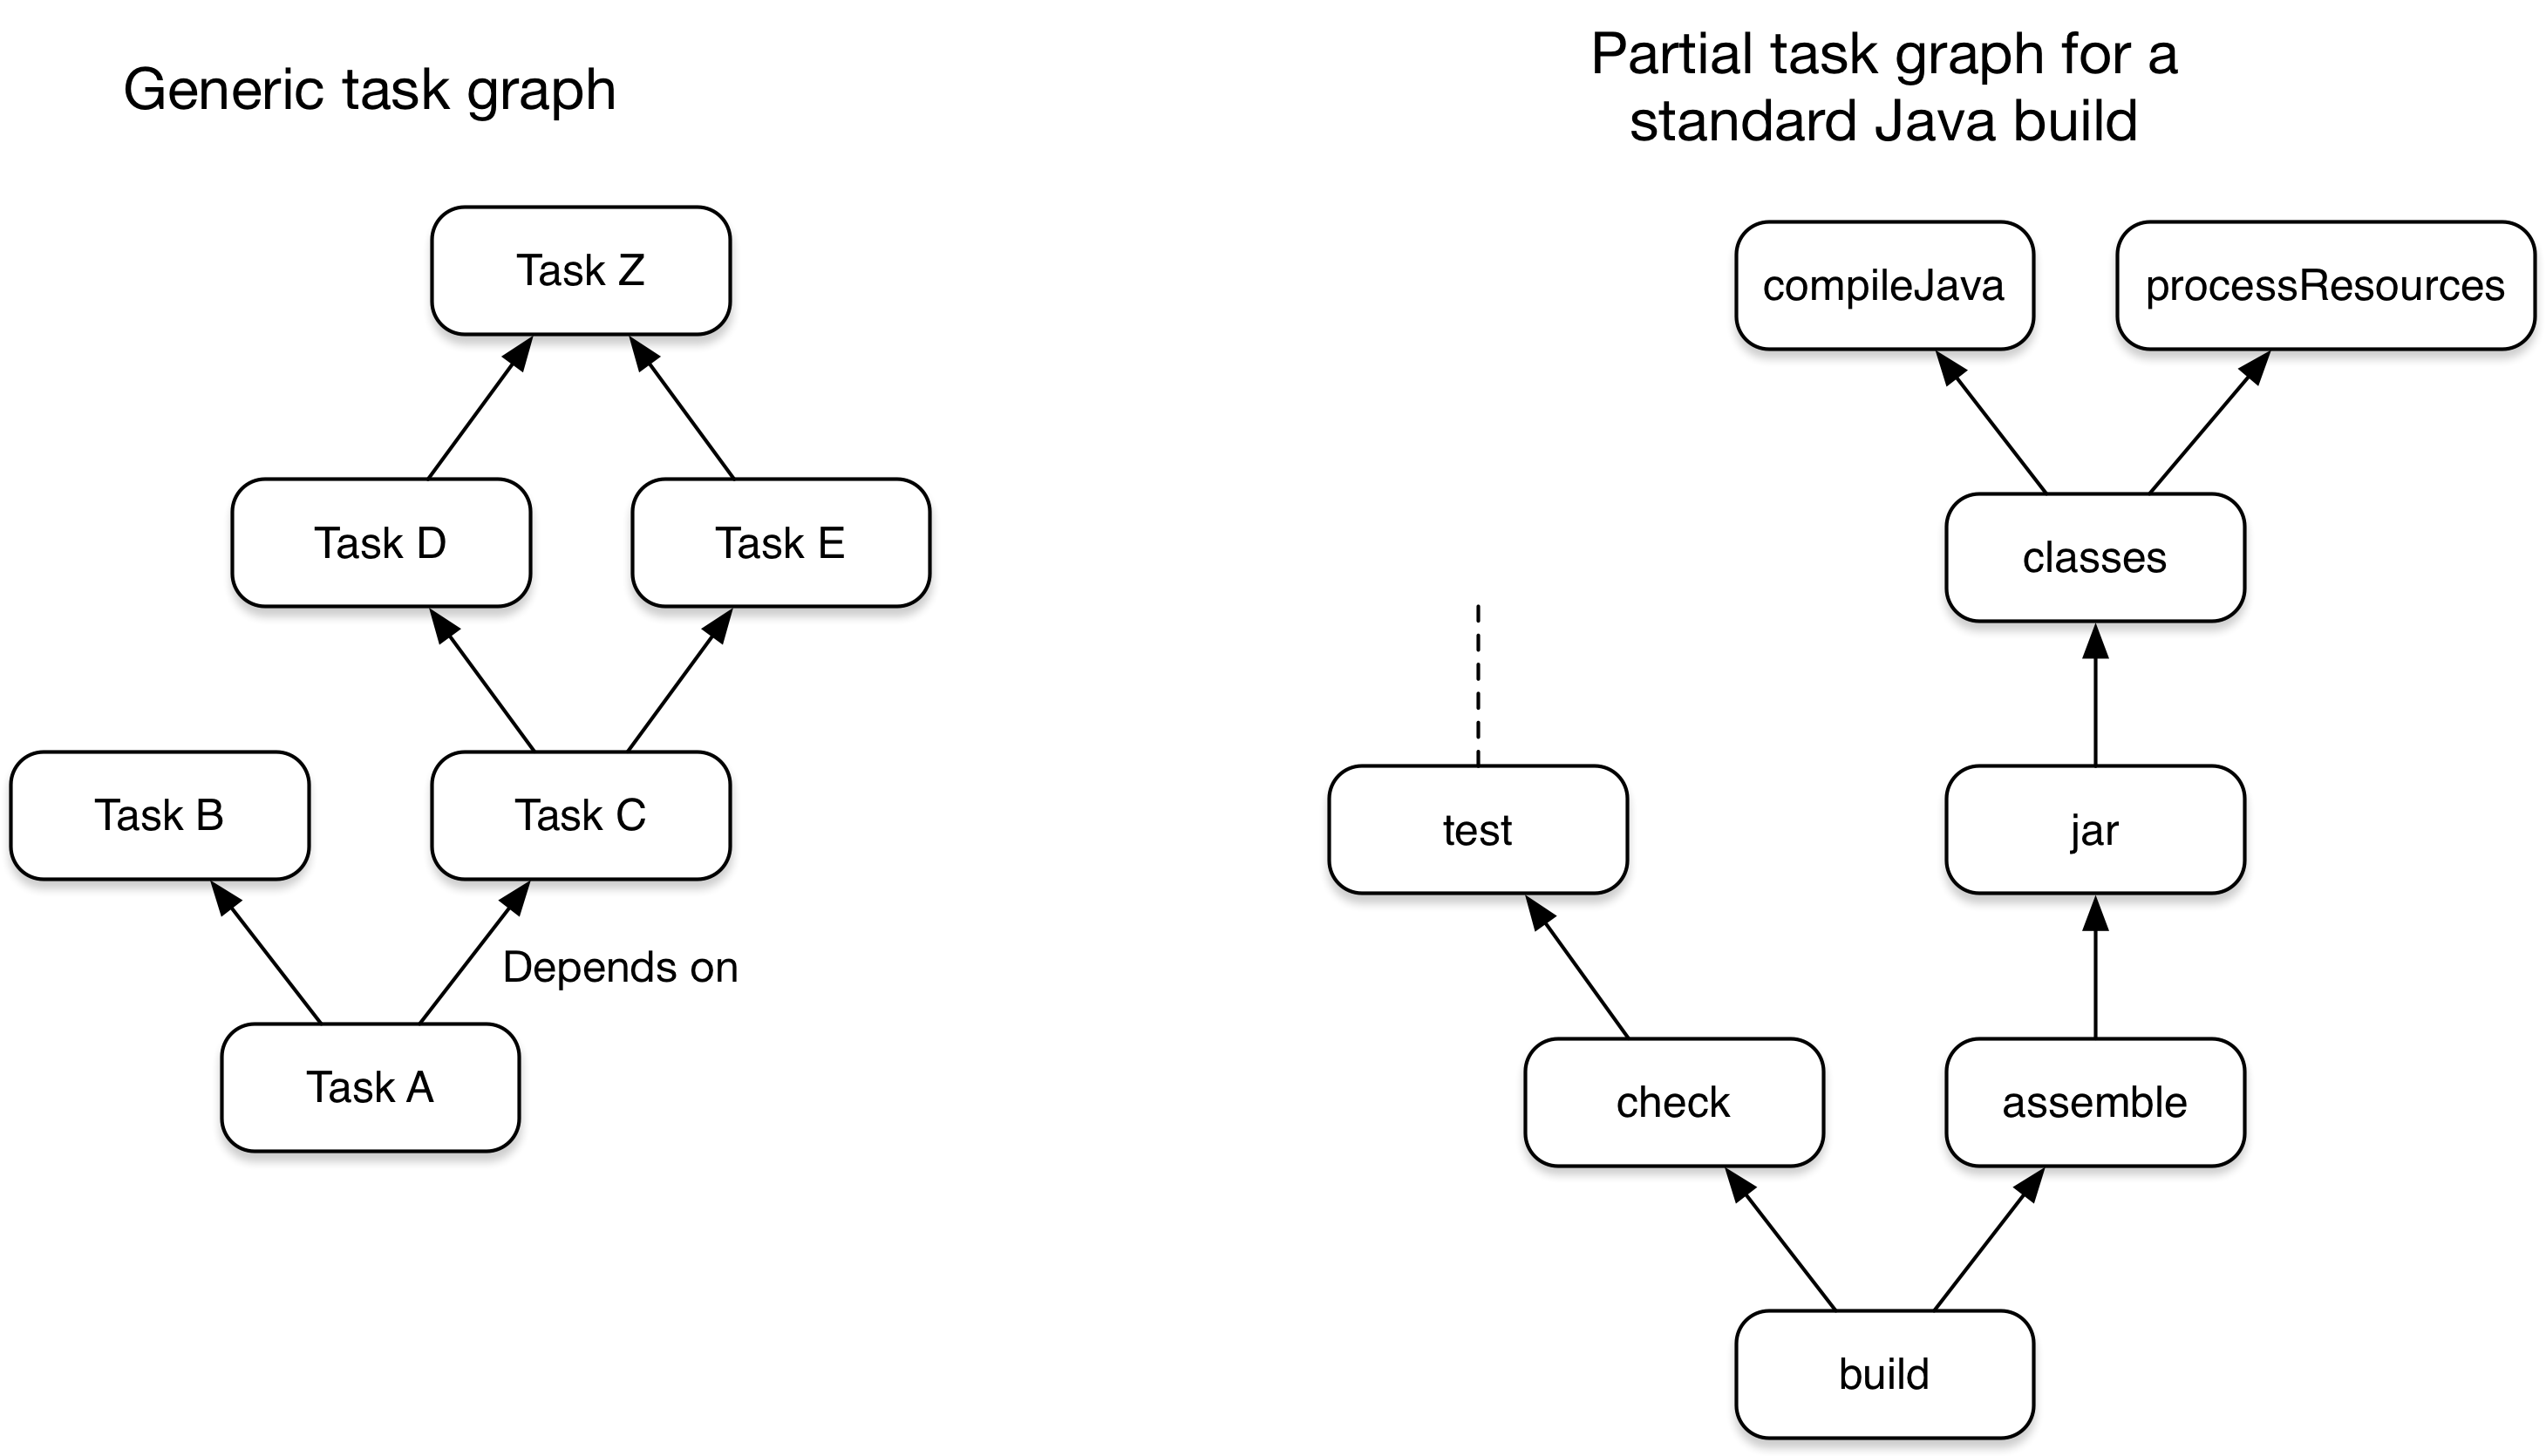 이미지 출처: What is Gradle?
task 실행
build.gradle 파일에 아래 코드를 추가해보아요.
참고로, 사용자 정의 Task 는 gradle tasks 명령으로 확인할 때 Other tasks 에 표시된답니다.
task welcome {
    println 'Welcome Gradle!'
}
그래들은 멀티 프로젝트를 구성할 수있기 때문에 콜론(:)으로 프로젝트와 Task를 구별합니다.
공란인 이유는 싱글 프로젝트여서겠지요.
$ gradle welcome // $ gradle :welcome 동일

> Configure project :
Welcome Gradle!

BUILD SUCCESSFUL in 0s
task를 실행해보아요.
참 쉽죠잉~?
디폴트 Task 지정
build.gradle 파일에 아래와 같이 설정 해보아요.
설명도 추가하고 의존관계 task도 설정해볼까요?
아래 설정이라면 hello task 를 실행 후 welcome task를 실행한답니다.
defaultTasks 'welcome(description:'디폴트 Task입니다.', dependsOn:'hello')'
그런 다음 gradle 실행을 하면
$ gradle

> Configure project :
Welcome Gradle!
Hello~
Task 그룹
task 를 그룹으로 묶으면 유지보수할때 편하겠죠?
build.gradle 파일에 아래와 같이 설정 해보아요.
def myGroup = 'Group'

task task1(group: myGroup) {
    println "task1"
}

task task2(group: myGroup) {
    println "task2"
}
확인해 볼까요?
$ gradle tasks

Group tasks
-----------
task1
task2
Task All
Task 전체 목록을 확인하고 싶다고요?
아래 명령을 실행하면 task 전체가 실행됩니다.
$ gradle tasks --all

> Configure project :
Welcome Gradle!
Hello~
...
Default tasks: welcome
...

Other tasks
-----------
hello
welcome - 디폴트 Task입니다.
Log Level
| Option | ERROR | Error messages |
|---|---|---|
| -q or –quiet | QUIET | Important information messages |
| -w or –warn | WARNING | Warning messages |
| no logging options | LIFECYCLE | Progress information messages |
| -i or –info | INFO | Information messages |
| -d or –debug | DEBUG | Debug messages |
Gradle Docs - Logging 페이지를 방문하시면 더욱 자세한 설명을 확인 할 수있습니다.
로그레벨의 기본값은 LIFECYCLE 입니다.
task 단위로 로그레벨을 달리 설정할수 있지요.
참고로, DEBUG 레벨로 설정하면 Task 에 관련된 모든 정보가 출력된답니다.
task hello {
    logging.level=LogLevel.DEBUG
    println 'Hello~'
}
로그를 간결하게 출력해볼까요?
$ gradle -q

Welcome Gradle!
Hello~
Compile
build.gradle 파일에 java 플러그인을 설정합니다.
그외 필요한 디렉토리(main, test) 들을 생성합니다.
apply plugin: 'java'
프로젝트를 새로 구성해도 됩니다. (이게 더 손쉽지요.)
$ gradle init --type java-library

Select build script DSL:
  1: groovy
  2: kotlin
Enter selection (default: groovy) [1..2] 1

Select test framework:
  1: junit
  2: testng
  3: spock
Enter selection (default: junit) [1..3] 1

Project name (default: gralde_practice2): practice2
Source package (default: practice2):

BUILD SUCCESSFUL in 43s
2 actionable tasks: 2 executed
프로젝트를 컴파일 합니다.
$ gradle compileJava

BUILD SUCCESSFUL in 8s
1 actionable task: 1 executed
build 디렉터리는 그래들에서 컴파일할 때 클래스 파일들이 위치하는 기본 경로로,
컴파일 이전의 디렉터리 구조와 동일하게 생성됩니다.
엔터프라이즈 빌드 자동화를 위한 Gradle - 한빛 미디어 p.34
자, build 디렉토리가 가서 확인해볼까요?
$ ll build/classes/java/main/practice2/
total 16
-rw-r--r--  1 we  staff   605B  7  8 18:53 Sample.class
-rw-r--r--  1 we  staff   350B  7  8 18:53 Library.class
java plugin
java plugin 설정을 추가하니 아래 Task 들이 추가되어 있군요.
$ gradle tasks

Build tasks
-----------
assemble - Assembles the outputs of this project.
build - Assembles and tests this project.
buildDependents - Assembles and tests this project and all projects that depend on it.
buildNeeded - Assembles and tests this project and all projects it depends on.
classes - Assembles main classes.
clean - Deletes the build directory.
jar - Assembles a jar archive containing the main classes.
testClasses - Assembles test classes.

Documentation tasks
-------------------
javadoc - Generates Javadoc API documentation for the main source code.

Verification tasks
------------------
check - Runs all checks.
test - Runs the unit tests.
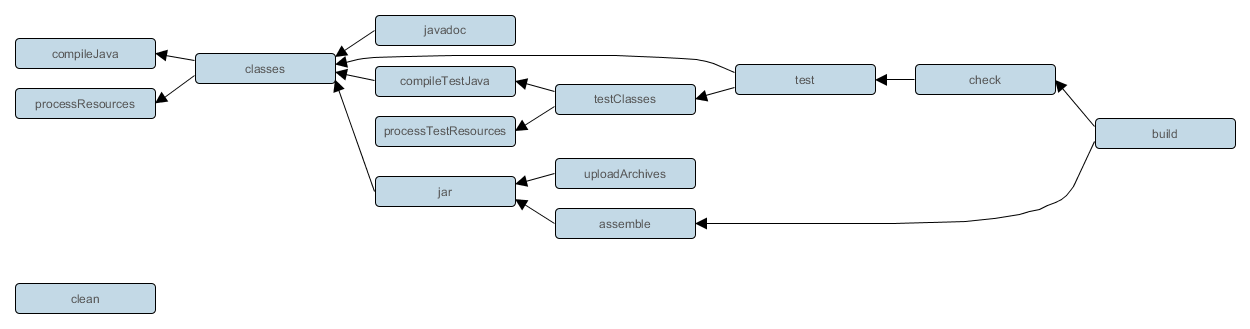
이미지 출처: The following diagram shows the relationships between these tasks.
위 이미지를 보시면 java plugin 설정했을 때 사용할 수 있는 task 명령과 의존관계를 한눈에 보실 수 있어요.
Project layout
The Java plugin assumes the project layout shown below.
| 구분 | 기본 output 디렉토리 경로 |
|---|---|
| src/main/java | Production Java source. |
| src/main/resources | Production resources, such as XML and properties files. |
| src/test/java | Test Java source. |
| src/test/resources | Test resources. |
| src/sourceSet/java | Java source for the source set named sourceSet. |
| src/sourceSet/resources | Resources for the source set named sourceSet. |
디렉토리 구조 변경은 설정에서 가능합니다. 매뉴얼에 있습니다.
기본 디렉토리 구조는 소스 레벨에 정의 되어 있지요.
하단 소스코드 에서 확인 가능하지요.
Clean
build 디렉토리에 컴파일된 class 파일을 삭제해볼까요?
$ gradle clean task

$ ls build/classes/java/main/practice2/
ls: build/classes/java/main/practice2/: No such file or directory
Build
wrapper로 빌드 해볼까요?
clean 명령어와 함께 쓰면 기존 compile 된 파일을 삭제하고 build 를 실행한답니다.
$ ./gradlew clean build
Java Plugin 설정 후 build 명령을 실행하면 JAR 형태로 기본 패키징됩니다.
메이븐으로 치면 package 명령어 라고 볼 수 있지요.
$ gradle build
...

$ ls -al build/libs/
total 8
-rw-r--r--  1 we  staff   3.5K  7 19 16:23 practice2.jar
Gradle 에서 Jar 파일 생성 기본 경로는 libs 디렉토리입니다.
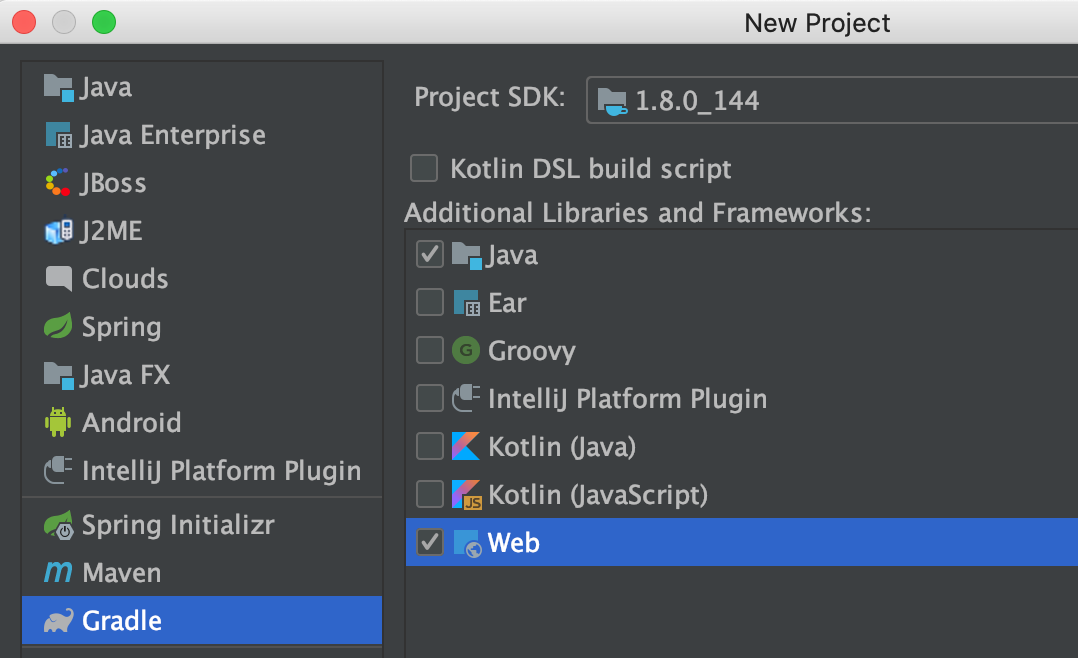
Run
IntelliJ 에서 gradle 프로젝트를 생성합니다.
/source/gradle-sample/first$ ./gradlew war
...
BUILD SUCCESSFUL in 0s
1 actionable task: 1 executed
$ ll /source/gradle-sample/first/build/libs/
-rw-r--r-- 1 willow staff 582B 12 2 00:36 first-1.0-SNAPSHOT.war
/source/gradle-sample/first$ mv build/libs/first-1.0-SNAPSHOT.war /usr/local/apache-tomcat-8.5.15/webapps/first.war
$ cd /usr/local/apache-tomcat-8.5.15/webapps/
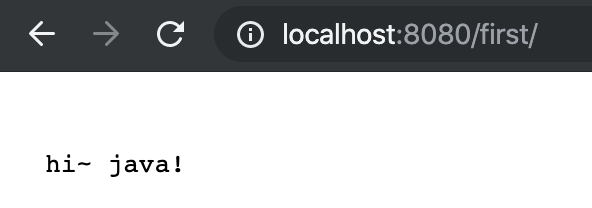
$ bin/startup.sh
브라우저에서 확인해보아요.
Run with Spring Boot
스프링부트 프레임웍을 사용한경우 bootRun 명령어를 지원한답니다.
bootRun gradle plugin은 스프링부트에서 어플리케이션을 분리된 형태로 실행할 수 있게 해주지요.
(자매표 bootWar)
Single Project
단일 프로젝트인 경우
(settings.gradle 파일이 없는 경우)
$ ./gradlew bootRun -Dspring.profiles.active=dev
Multi Project
멀티 프로젝트인 경우
settings.gradle 파일에 프로젝트 목록이 있겠지요.
$ cat settings.gradle
rootProject.name = 'tree project'
include 'tree-web'
include 'tree-batch'
include 'tree-api'
include 'tree-file'
멀티프로젝트로 형식으로 구성된 스프링부트 프로젝트를 실행할때 명령어입니다.
프로젝트명:bootRun 를 사용해서 서비스를 띄워봅시다.
$ ./gradlew tree-web:bootRun -Dspring.profiles.active=dev
gradle 사이트 안내에서 가져왔어요.
Example: Listing the projects in a build
멀티 프로젝트 구조를 확인해보아요.
$ gradle -q projects

------------------------------------------------------------
Root project
------------------------------------------------------------

Root project 'multiproject'
+--- Project ':api'
+--- Project ':services'
|    +--- Project ':services:shared'
|    \--- Project ':services:webservice'
\--- Project ':shared'

To see a list of the tasks of a project, run gradle <project-path>:tasks
For example, try running gradle :api:tasks
Scope
| 스코프 설정 | 관련 Task | 설명 |
|---|---|---|
| compile | compileJava | 컴파일 시 포함해야 할 때 |
| runtime | - | 실행시점에 포함해야 할 때 |
| testCompile | compileTestJava | 테스트를 위해 컴파일할 때 포함해야 할 때 |
| testRuntime | test | 테스트를 실행시킬 때 |
컴파일과 테스트는 구분이 쉽지만, 컴파일과 실행시점(런타임)의 구분은 조금 혼란스러울 수 있습니다.
예를 들어, 서블릿으로 웹 페이지를 작성할 때 실행할 수 있는 클래스를 작성하기 위해서는 HttpServlet 클래스를 상속받아서 자바 코드를 작성해야 합니다.
그리고 HttpServlet 클래스를 상속하기 위해서는 servlet-api.jar 파일이 컴파일 시 포함되어야 합니다.
이렇게 해서 컴파일을 하면 HTTP 요청을 처리할 수 있는 클래스가 준비됩니다.
하지만 웹 페이지에 데이터를 표현하기 위해서 JSTL과 같은 태그 라이브러리를 사용하는 경우에는 실행시점에만 사용해도 무방합니다.
JSTL은 서블릿을 생성할 때는 필요하지 않고 서블릿 생성이 끝나고 HTTP 요청을 받아서 JSP에 전달되었을 때 브라우저에서 마크업Markup을 랜더링하면서 태그를 자바의 변수값으로 치환해주기 때문입니다.
이처럼 스코프를 이용하면 라이브러리를 각 단계에 따라 다르게 적용해서 사용할 수 있습니다.
엔터프라이즈 빌드 자동화를 위한 Gradle - 한빛 미디어 p.37
Dependecies
build.gradle 파일에 dependencies 외부 라이브러리를 추가해 볼까요?
dependencies {
    compile 'org.slf4j:slf4j-api:1.7.7'
    compile 'com.itextpdf:itextpdf:5.5.5'
}
라이브러리 추가전 화면입니다.
$ gradle dependencies
runtime - Runtime dependencies for source set 'main' (deprecated, use 'runtimeOnly' instead).
No dependencies
라이브러리 추가후 화면입니다.
$ gradle compileJava
...

$ gradle dependencies

runtime - Runtime dependencies for source set 'main' (deprecated, use 'runtimeOnly' instead).
+--- org.slf4j:slf4j-api:1.7.7
\--- com.itextpdf:itextpdf:5.5.5
Plugins
Gradle 에 사용할 수 있는 plugins을 검색할 수 있어요.
위에서 이야기한 spring boot 플러그인 페이지입니다.
The Gradle Wrapper
설치된(locally) gradle 버전과 유지보수할 프로젝트의 gradle 버전이 달라 빌드가 실패하는거예요.
이럴때 gradle wrapper 는 없어서는 안될 녀석입죠. (너란 존재, 빛나는구나)
gradle wrapper 는 JAVA도 gradle 도 설치할 필요가 없지요.
로컬에 설치된 gradle 버전도 신경 쓸 필요도 없구요.
그러니 gradle wrapper 를 사용합시다.
Gradle wrapper 의 버전을 수정하게 되면 task 실행시 자동으로 새로운 Wrapper 파일을 로컬캐시에 다운로드 받는답니다.
gradle wapper 에 설정된 버전을 확인하고 싶을땐 아래 경로에서 버전을 확인하세요.
/project/gradle/wrapper/gradle-wrapper.properties
distributionUrl=https\://services.gradle.org/distributions/gradle-5.2.1-bin.zip
cli 명령어로도 확인가능하지요.
프로젝트별로 버전이 다른걸 확인 할 수 있습니다.
~/Documents/source/willow/toybox $ ./gradlew -v
Gradle 5.2.1

~/Documents/source/company/project $ ./gradlew -v
Gradle 5.1
로컬 환경 gradle 버전을 확인해 볼까요?
~/Documents/source/willow/gralde_practice $ gradle --version

------------------------------------------------------------
Gradle 5.2.1
------------------------------------------------------------

Build time:   2019-02-08 19:00:10 UTC
Revision:     f02764e074c32ee8851a4e1877dd1fea8ffb7183

Kotlin DSL:   1.1.3
Kotlin:       1.3.20
Groovy:       2.5.4
Ant:          Apache Ant(TM) version 1.9.13 compiled on July 10 2018
JVM:          1.8.0_131 (Oracle Corporation 25.131-b11)
OS:           Mac OS X 10.14.5 x86_64
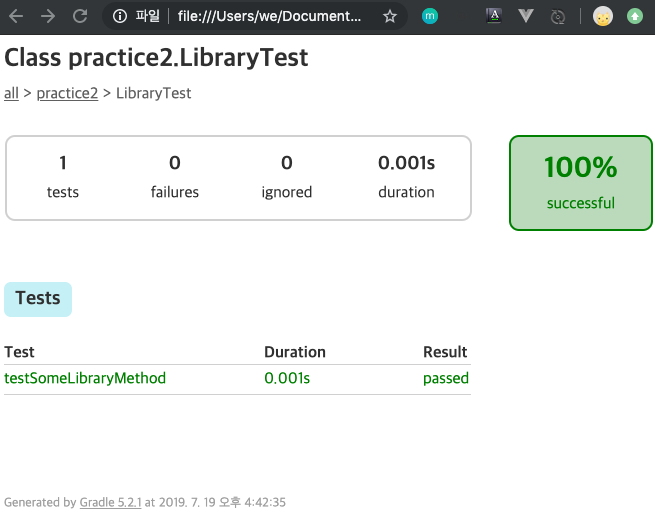
TEST
test 코드가 있는 프로젝트에 test 명령를 실행합니다.
$ gradle clean test
gradle에서 제공해주는 report 화면이 생성되었는지 볼까요?
$ ll build/reports/tests/test/
total 8
drwxr-xr-x  4 we  staff   128B  7 19 16:42 classes/
drwxr-xr-x  4 we  staff   128B  7 19 16:42 css/
-rw-r--r--  1 we  staff   2.6K  7 19 16:42 index.html
drwxr-xr-x  3 we  staff    96B  7 19 16:42 js/
drwxr-xr-x  4 we  staff   128B  7 19 16:42 packages/
브라우저에서 확인해 보아요~
ETC
Source
로컬 환경에 설치된 gradle 소스를 구경해보았어요.
Settings
/usr/local/gradle-4.8./src/core-api/org/gradle/api/initialization/Settings.java
@HasInternalProtocol
public interface Settings extends PluginAware {
    /**
     * <p>The default name for the settings file.</p>
     */
    String DEFAULT_SETTINGS_FILE = "settings.gradle";
Project
/usr/local/gradle-4.8.1/src/core-api/org/gradle/api/Project.java
@HasInternalProtocol
public interface Project extends Comparable<Project>, ExtensionAware, PluginAware {
    /**
     * The default project build file name.
     */
    String DEFAULT_BUILD_FILE = "build.gradle";
/usr/local/gradle-4.8.1/src/core-api/org/gradle/api/Task.java
    /**
     * The default build directory name.
     */
    String DEFAULT_BUILD_DIR_NAME = "build";
Task 인터페이스에서는 기본적으로 Task의 이름과 Task의 유형, Task의 의존성 여부, Task 액션 등을 속성으로 가지고 있습니다.
엔터프라이즈 빌드 자동화를 위한 Gradle - 한빛 미디어 p.10
IntelliJ 설정
| 구분 | 기본 output 디렉토리 경로 |
|---|---|
| 이클립스 | bin |
| 인텔리제이 | out |
이클립스의 기본 output 디렉토리는 bin 이고,
인텔리제이 기본 output 디렉토리는 out입니다.
인텔리제이 IDE 를 쓰는 경우 아래 내용을 참고하세요.
상호 간에 소스 디렉터리를 공유해서 개발을 진행하는 경우에는 로컬 개발 환경이 서로 다른데, 이 경우 정보가 각 개발 도구의 메타 정보에 포함되어 있어서 문제가 생기는 경우가 있습니다.
그래들의 idea와 eclipse 같은 Task를 활용하면 각 개발 도구의 메타 정보를 생성할 수 있으므로 소스 공유 시 로컬 환경에 따른 충돌을 방지하고 개발을 진행할 수 있습니다.
엔터프라이즈 빌드 자동화를 위한 Gradle - 한빛 미디어
build.gradle 파일에 아래와 같이 설정해주세요.
idea{
  module{
      outputDir = file("${buildDir}/classes/main")
      inheritOutputDirs = false
      downloadSources = true

      excludeDirs = [file(".gradle")]
      ["classes", "docs", "dependency-cache", "libs", "reports", "resources", "test-results", "tmp"].each {
          excludeDirs << file("$buildDir/$it")
      }
  }
}