Ningx 서버에 이어 Apache 서버 SSL 인증서를 교체해보겠습니다.
- Nginx SSL 인증서 교체 SERIES 1/2
- Apache SSL 인증서 교체 ✓ SERIES 2/2
L4 VIP 구성되어 있는 서비스인경우 한대씩 작업하게 되는데요.
이럴때 작업할 서버를 /etd/hosts 파일에 IP를 입력한 후 브라우저에서 확인하고 있습니다.
Server Spec.
$ ./httpd -V
Server version: Apache/2.4.39 (Unix)

$ cat /etc/redhat-release
CentOS Linux release 7.4.1708 (Core)

$ arch
x86_64
SSL 인증서 갱신
만료일 갱신한 인증서 파일을 준비합니다.
nignx 갱신때는 체인 파일이 없었습니다. apache 설정에는 체인 파일이 필요합니다.
$ ll nginx.*
-rw-r--r--@ 1 tree  willow   1.7K  7 26 15:00 apache.key
-rw-r--r--@ 1 tree  willow   2.4K  7 26 15:00 apache.pem
-rw-r--r--@ 1 tree  willow   2.4K  7 26 15:00 apache.crt
인증서 파일(key, pem)을 게이트웨이 서버에 전송합니다.
$ scp ~/Downloads/apache.* 사용자@게이트웨어서버:~/
Apache 설정파일을 볼겠습니다.
$ vi ~/apache-2.4.39/conf/httpd.conf

<IfModule mod_ssl.c>
        SSLProtocol all -SSLv2 -SSLv3
        SSLHonorCipherOrder on
        SSLCipherSuite HIGH:MEDIUM:!SSLv2:!PSK:!SRP:!ADH:!AECDH
        SSLRandomSeed startup builtin
        SSLRandomSeed connect builtin
        SSLPassPhraseDialog  exec:conf/apache.pass
</IfModule>

<VirtualHost *:443>
        DocumentRoot /home/user/html/web_site
        ServerName web.site.com
        ServerAlias api.web.site.com

        <IfModule mod_ssl.c>
                SSLEngine on
                SSLProtocol all -SSLv2 -SSLv3
                SSLHonorCipherOrder on
                SSLCipherSuite HIGH:MEDIUM:!SSLv2:!PSK:!SRP:!ADH:!AECDH
                SSLCertificateFile conf/apache.pem
                SSLCertificateKeyFile conf/apache.key
                SSLCertificateChainFile conf/apache.crt
        </IfModule>
SSLPassPhraseDialog 옵션을 사용하고 있습니다.
암호화된 Private Key 파일을 그대로 사용하고 Private Key의 암호가 기재되어 있는 파일의 경로를 설정하였습니다.
SSLPassPhraseDialog
Default : builtin
Apache v2 onlybuiltin
This is the default: an interactive dialog occurs at startup. The administrator has to type in the passphrase for each encrypted Private Key file. Since the same pass phrase may apply to several files, it is tried on all of them that have not yet been opened.
exec:/ path / to / program
An external program is specified which is called at startup for each encrypted Private Key file. It is called with two arguments (the first is servername:portnumber; the second is either RSA or DSA), indicating the server and algorithm to use. It should then print the passphrase to stdout. The idea is that this program first runs security checks to make sure that the system is not compromised by an attacker. If these checks are passed, it provides the appropriate passphrase. Each passphrase is tried, as earlier, on all the unopened private key files.
출처 : https://www.oreilly.com/library/view/apache-the-definitive/0596002033/re177.html
혹시 모를 롤백을 대비해서 백업합니다.
$ cp apache.crt apache.crt_20230726
$ cp apache.key apache.key_20230726
$ cp apache.pem apache.pem_20230726
$ cp apache.pass apache.pass_20230726
작업할 서버를 L7 에서 내려줍니다. 방법은 서버 구성에 따라 ~
이서버는 static 파일을 조회해서 l4 heath check 를 하고 있습니다.
$ mv ~/html/common/monitor/ok.html ~/html/common/monitor/ok_del.html
기존 인증서 파일을 신규 인증서 파일로 overwrite 합니다.
$ mv ~/apache.crt ~/apache-2.4.39/conf/apache.crt
$ mv ~/apache.key ~/apache-2.4.39/conf/apache.key
$ mv ~/apache.pem ~/apache-2.4.39/conf/apache.pem
비밀번호도 신규 인증서에 맞게 수정합니다.
$ vi apache.pass
파일 권한을 확인합니다.
key 파일과 비빌번호 파일은 소유자 실행권한(u+x)이 있어야 합니다.
$ chmod 644 apache.crt apache.pem
$ chmod 775 apache.key apache.pass
비밀번호 파일을 실행했을때 내용이 잘 나오는지 확인합니다.
$ ./apache.pass
password!@3
Apache 설정 신택스 오류 여부를 확인합니다.
$ ~/apache-2.4.39/bin/apachectl -t
Syntax OK
Apache 설정 적용합니다.
$ ~/apache-2.4.39/bin/apachectl -k graceful
브라우저에서 새로고침 후 인증서 보기로 만료일을 확인합니다.
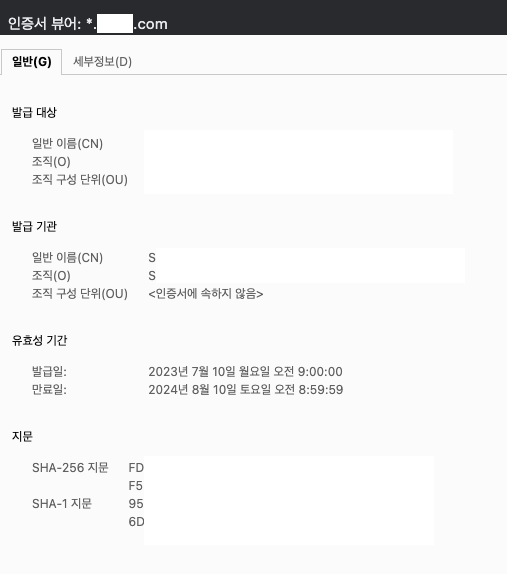
| 변경전 | 변경후 |
|---|---|
| 발급일:2022년 6월 30일 목요일 오전 9:00:00 만료일:2023년 8월 1일 화요일 오전 8:59:59 |
발급일:2023년 7월 10일 월요일 오전 9:00:00 만료일:2024년 8월 10일 토요일 오전 8:59:59 |
작업 완료한 서버를 L7에도 올려줍니다.
mv ~/html/common/monitor/ok_del.html ~/html/common/monitor/ok.html